Tuesday, 4 April 2017

Using Automapper to upload file from HttpPostedFile to entity File

If you are using Automapper, this is how to upload a file from input type file (HttpPostedFile) to domain entity (File). This is also updating existing entity if exist.

public static void Initialize()
{
    Mapper.Initialize(cfg =>
     {
      cfg.CreateMap<HttpPostedFileBase, File>().
         ConvertUsing((source, dest) =>
         {
          File result = dest ?? new File();
          if (source != null)
          {
              result.FileName = System.IO.Path.GetFileName(source.FileName);
              result.ContentType = source.ContentType;
              using (var reader = new System.IO.BinaryReader(source.InputStream))
               result.FileContent = reader.ReadBytes(source.ContentLength);
          }
          return result;
         });
     });
#if DEBUG
    Mapper.AssertConfigurationIsValid();
#endif
}

As you can see I use ConvertUsing, because I could built entirely new object or update existing destination (the dest variable). ConvertUsing also ignore validation of those type. This is the domain entity File definition.


    public class File
    {
        [Key]
        public int Id { get; set; }
        [Required]
        public string FileName { get; set; }

        [Required]
        [Column(TypeName = "varbinary(max)")]
        public byte[] FileContent { get; set; }

        public string ContentType { get; set; }

    }

And last thing, you need to call mapper using theirs method and not the property. Property will return a new entity, and method return existing one so it can be used to update EF domain.

I was using Automapper version 6.0.2 in an ASP.Net MVC project with code first Entity Framework 6.

Thursday, 15 December 2016

Integration test with SQL express DB Entity Framework

There are many ways to do integration testing against database, most people will used moq or Effort on Entity Framework (EF). But there were limitation to what they could do. You need to learn how to use moq, and although there were many post on how to use moq. I haven't been able to mock DbSet Set method in EF6 which I used, which is indication that you need to learn how to use moq properly.

Effort on the other hand, provide an in-memory database from schema created by entity framework. This is nice, however it does have limitation. Effort can only be used to simulate object that goes through entity framework pipeline, specific SQL operation like stored procedure, function, or trigger won't work.

What about SQL Express DB, this is a real database engine and you could easily init those DB with data, and re-init before doing the test again. This also serve as end-to-end testing that will ensure your application will work against database.

Some people do this test using SQL Server also, but using SQL Server required you to set tear up and tear down script running before and after test. Using SQL Express you can always start your test with fresh DB with condition you setup will be exactly the same every time you run it.

This post will showed you how to do this integration testing using SQL Express. Developing tools will be vary, but I'll be using Visual Studio 2015 community edition and the project that I'll be testing on is SharePoint 2013 full trusted code (Visual web part, and other "separation of concern" projects).

Step you need to setup this test:
  1. Create full SQL script from your DB
    • Open up your database with SQL Server Management Studio
    • Right click on it > Tasks > Generate Scripts...
    • Click button Next on Introduction screen
    • At Choose objects, choose "Select specific database objects", click button "Select All", and click button Next
    • Select where you want to store this SQL file. This file will become database initialize for our integration test DB. I put this file under VS test project
    • Click Next & Next again to built the script
  2. Add database on your test project
    • Open up Server Explorer
    • Right click on Data Connections > Create New SQL Server Database
    • Enter SQL express instance "(localdb)\MSSQLLocalDB" at Server Name (I used SQL Express 2016, if you used SQL Express version lower than 2014 you need different instance based on version, ex: SQL Express 2012 instance will be "(localdb)\v11".
    • Enter New database name, and click button OK
    • We're going to move this DB to test project, so delete that DB connection.
    • Your DB will be reside under default location SQL express that is in the root of the user profile  (C:\Users\<user name>, copy that DB into your test project.
  3. Create database test in that test DB
    • Connect to your newly copied DB in test project, by going to Server Explorer
    • Right click on Data Connections > Add Connection...
    • Enter "(localdb)\MSSQLLocalDB" at Server Name
    • Choose Attach a database file > select your copied DB in test project
    • Give a Logical name to make it easier
    • Open up your generated SQL DB > click on icon Connect
    • Select Local > MSSQLLocalDB
    • Under Database Name, select yours DB logical name you've entered before
    • Click Connect
    • Click on icon Execute
    • Take note/fix every error encounter in this execute script, we need that note whenever we want to recreate test DB
  4. Create & execute others SQL script that will fill your test DB with Data, or other SQL objects like Linked Server. You can make that under 1 SQL file or separate it, just make sure that you know which one need to be executed before and after.
  5. Each time project built or rebuilt, file which has "Copy always" attribute will be checked for versions. If the versions are the same, a checksum comparison is made and will be copied if checksum is not the same. This is how we keep the DB always new before each run test. When we added that DB file, it will have property "Copy always" in "Copy to Output Directory". In case it didn't have that, this is how we set property "Copy always"
    • Right click on SQL DB file > Properties
    • Select "Copy always" on property setting "Copy to Output Directory"
  6. Built connection string to that DB in build folder
    • the connection string will be something like this "Data Source=(localdb)\MSSQLLocalDB;AttachDbFilename=|DataDirectory|\<DBFileName>.mdf;Initial Catalog=<DBName>;Integrated Security=True;MultipleActiveResultSets=True;App=EntityFramework"
    • Notice that I use keyword |DataDirectory|, that keyword will be replaced by value set with method AppDomain.SetData("DataDirectory", objValue) the default value is application folder (build folder).
That's all you need to create this integration test with SQL express.
If you are on Test Driven Development, you can always start from creating SQL express DB and create script to be used in real environment.

ref:
  • https://effort.codeplex.com/
  • https://msdn.microsoft.com/en-us/library/dn314429(v=vs.113).aspx
  • https://msdn.microsoft.com/en-us/library/0c6xyb66(v=vs.100).aspx
  • https://msdn.microsoft.com/en-us/library/cc716756(v=vs.110).aspx
  • https://social.msdn.microsoft.com/Forums/sqlserver/en-US/dc31ea59-5718-49b6-9f1f-7039da425296/where-is-datadirectory-?forum=sqlce

Friday, 21 October 2016

SQL Server AlwaysOn Availability Group (AAG) Automatic Failover in Asynchronous mode

AAG has two commit mode that we can choose: Synchronous mode, and Asynchronous mode.
While synchronous offer zero data loss, this is not intended for disaster recovery site which usually located far from data center. Asynchronous mode offer better performance, however AAG with asynchronous commit mode doesn't allow automatic failover to secondary site.

SQL Server throws error number 1480 whenever there is a change between primary and secondary roles. We can setup alert that capture those error and switch over to secondary site. Since forced failover to secondary DB can be run using this command "ALTER AVAILABILITY GROUP [AAG Name] FORCE_FAILOVER_ALLOW_DATA_LOSS", we can use that command to switch to secondary DB using SQL alert. For more information on how to create that alert, please see reference 2.

Here's a video showing you that it can be done https://youtu.be/PhS4HhDHdFI

Reference
1. https://msdn.microsoft.com/en-us/library/hh781257.aspx
2. http://sqlmag.com/blog/alwayson-ags-and-sql-server-jobs-setting-failover-alerts

Thursday, 7 January 2016

Anonymous Access to SharePoint 2013 Document Library

I want to share my experience when testing and creating a public share document on an intranet site that can also be accessed from internet.


Step to create
  • Go to Central Administrator > Manage Web Applications
  • Select web application you want to enable
  • On the ribbon menu click on Authentication Providers
  • Click on the Zone you want to enable anonymous access
  • Mark Enable anonymous access and click Save
 
This will allow site to be share to anonymous user, but we need to specified which site to share.
  • Go to the site you want to share
  • Head to Site Settings > Site Permissions
  • On the ribbon menu click on Anonymous Access
 
Then the library we want to share
  • Select Lists and libraries and click OK to save this setting
  • Head to document library settings Permissions
  • On the ribbon menu click on Anonymous Access
  • Mark View Items than click OK
 
Thinks to know
  1. Anonymous user cannot access home site with this setting, so you need to send them link to that document library.
  2. Anonymous can be set for 1 document library or list. But despite what this link told me, I didn't find how to share only 1 item.
    1. If you Set Site Permission to Nothing, you won't find option to allow access view to anonymous user in document library.
    2. To share only 1 item, you need to enable anonymous access to those library and break others items permission that you don't want to share
  3. If you still ask for login to document library
    1. Disable site collection feature "Limited-access user permission lockdown mode"
    2. Enable anonymous to entire site
    3. Enable inherited permission in target document library
    4. Test access to site and document library (both should be accessible)
    5. Enable anonymous to List and libraries
    6. Disable inherited permission in target document library
    7. Grant view to anonymous user
    8. Test access to site (it should ask for login)
    9. Test access to document (it should be accessible without login)
    10. Enable site collection feature "Limited-access user permission lockdown mode"
    11. All above combination did the trick for me.
 
Reference that I used to find this:

Monday, 9 November 2015

SharePoint Farm configuration

Configure SharePoint Farm using NLB can be stressful, especially when you don't know anything about setting DNS and has access to it.  Here a list of what you need to setup & know on how to successfully setup this configuration. I'm using this example configuration 2 WFE server (WFE1 & WFE2).
  1. You need to have 3 static IP. 1 dedicated IP for server WFE1, another 1 dedicated IP for server WFE2, and the 3rd IP is for Cluster IP (Virtual IP on both server).
  2. You need to have a DNS name that pointed to IP Cluster (ex: farmaddress.company.com), make sure that your system admin didn't point that address to IP server (create DNS with type A).
  3. Configure your Alternate Access Mapping default zone to DNS name (ex: farmaddress.company.com)
  4. Some router didn't support multicast. So try configure NLB using unicast first, then you can try using multicast ref
  5. If you couldn't access DNS, you can try your configuration by adding that cluster IP using hosts file configuration on client PC.
  6. For how to test this NLB, you can look at this article Confirming Windows Load Balancing

Thursday, 28 May 2015

Using skin file in SharePoint Project

Building many custom input form for SharePoint which use many control style/configure can be tedious work. Especially if you have many developer working on the same project. CSS can be used for this purpose, but it work for general and not specific to styling certain control. ASPX have skin file that can be used for theme in web application project and it is for specific control. I've experimented on how to add this skin file to SharePoint project and use that skin feature for our SharePoint visual web part. This is how I've done it to make our project use skin file for configuring and styling web control easier.
  1. In your SharePoint Project, create folder "App_Themes"
  2. Inside that folder create a sub folder with name "Default" (we use Default for skin name)
  3. Add text file item into that folder and name it Default.skin (filename should be same with its folder)
  4. Add control you want to skin, for this example I'll use TextBox with SkinID "DefaultInput"

    <asp:TextBox runat="server" SkinID="DefaultInput" Width="200px"></asp:TextBox>
    

  5. As you can see I only add folder and not special SharePoint folder that will be packaged inside wsp file. This folder won't get deployed whenever we deploy this project and want to apply some skin, we need to get around with this problem.
  6. Skin files need to be put under IIS root. We could copy it manually into SharePoint folder inside wwwroot but I prefer creating cmd files that will copy it.
  7. Again add text file item and give it a name and add extension .cmd, I'll name it "DeploySkinFile.cmd"
  8. Insert this dos command into that file, this command will copy all files under App_Themes folder to "C:\inetpub\wwwroot\wss\VirtualDirectories\80"

    SET ACTIVEDIR=%1
    SET TARGETASP=C:\inetpub\wwwroot\wss\VirtualDirectories\80
    cd %ACTIVEDIR%
    IF not exist %TARGETASP%\App_Themes ( md %TARGETASP%\App_Themes )
    xcopy App_Themes %TARGETASP%\App_Themes /E /G /Y
    

  9. We need to run this automatically when we built this project. Right click on Project name -> Properties to open its properties window and head to "Build Events" tab
  10. Add this command under "Post-build event command line"

    "$(ProjectDir)DeploySkinFile.cmd" "$(ProjectDir)"
    

  11. We need to tell aspx to use this skin file, this can be done on page directive or on pages tag inside web.config. Since I'm using this for visual web part, I'm going to put it inside web.config. Open web.config under root folder of SharePoint, add this on the last tag pages
  12. Let's create a visual web part with textbox control and SkinID="DefaultInput" to test this.
  13. Now deploy the project and add that visual web part. Browse to it and view the source, the textbox will have width 200px as defined in skin file above
Download sample project here

Thursday, 14 May 2015

Create REST for Upload file and Transferring Parameter

We used SharePoint as a repository for some of our documents and was using CSOM as a way to upload it from another application. The problem came when we upload file and set some of its property after upload it. It turned out that update property after upload take a longer time than when you upload 11MB file. Doing a 11MB file upload using CSOM took 9.7s, while updating its property took 23.38s. We came out with the idea of using built-in SharePoint REST service, but we got bumped into 403 forbidden access error. And it wasn't the best solution because, upload and updating property will required 2 process (upload 1st than update property). If we could create a custom REST, you can just sent those properties in URL and send the stream of file into http request.

There were many tutorial about uploading files to REST service but there wasn't much on how to create service that upload file inside SharePoint 2013. Base on many reference on internet I've created a REST service which run under SharePoint 2013 project (Full trust code). So how do you add a svc file inside SharePoint 2013 project? You can search using this keyword "creating a custom svc in SharePoint 2013" on google. Or just create that svc on another project and put it under ISAPI directory on SharePoint project.
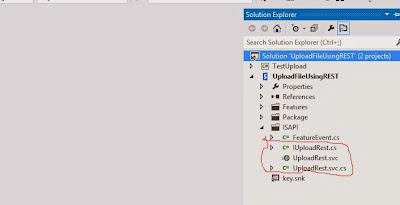


Then we start with setting up interface and define class definition that will become the output from our REST service.


using System;
using System.Collections.Generic;
using System.IO;
using System.Linq;
using System.Runtime.Serialization;
using System.ServiceModel;
using System.ServiceModel.Web;
using System.Text;
using System.Threading.Tasks;

namespace UploadFileUsingREST
{
    [ServiceContract]
    interface IUploadRest
    {
        [OperationContract]
        [WebInvoke(Method = "POST",
            UriTemplate = "UploadFile/{fileName}/{title}")]
        ConfirmationFileUpload Upload(string fileName, string title, Stream fileContent);
    }
    [DataContract]
    public class ConfirmationFileUpload
    {
        [DataMember]
        public long FileReceivedLength;
        [DataMember]
        public bool IsSuccess;
        [DataMember]
        public string ErrorMessage;
    }
}

After that we begin implementing code that will receive stream and update property of that file.


using Microsoft.SharePoint;
using System;
using System.Collections.Generic;
using System.IO;
using System.Linq;
using System.ServiceModel.Activation;
using System.Text;
using System.Threading.Tasks;

namespace UploadFileUsingREST
{
    [AspNetCompatibilityRequirements(RequirementsMode = AspNetCompatibilityRequirementsMode.Required)]
    public class UploadRest : IUploadRest
    {
        public const string SiteURL = http://siteurl;
        public ConfirmationFileUpload Upload(string fileName, string title, System.IO.Stream fileContent)
        {
            ConfirmationFileUpload result = new ConfirmationFileUpload();
            try
            {
                using (SPSite site = new SPSite(SiteURL))
                {
                    using (SPWeb web = site.OpenWeb())
                    {
                        using (MemoryStream writer = new MemoryStream())
                        {
                            int readCount;
                            byte[] buffer = new byte[8192];
                            while ((readCount = fileContent.Read(buffer, 0, buffer.Length)) != 0)
                                writer.Write(buffer, 0, readCount);
                            web.AllowUnsafeUpdates = true;
                            SPFile file = web.Files.Add(string.Format("{0}/Shared Documents/{1}", SiteURL, fileName), writer, true);
                            file.Update();
                            SPListItem item = file.ListItemAllFields;
                            item[SPBuiltInFieldId.Title] = title;
                            item.Update();
                            web.AllowUnsafeUpdates = false;
                            result.FileReceivedLength = file.Length;
                        }
                    }
                }
                result.IsSuccess = true;
            }
            catch (Exception e)
            {
                //log to ULS
                result.IsSuccess = false;
                result.ErrorMessage = e.Message;
            }
            finally
            {
                fileContent.Close();
            }
            return result;
        }
    }
}

The code was simple that it will receive the stream and save it to MemoryStream first before add it using Files.Add. Then we get listitem and update its property. You need to setting AllowUnsafeUpdates to true before add files to prevent error page need revalidation.

At this point you can try upload files using this REST service, but SharePoint limit max receive content length to only 18KB. Googling it out many people suggesting to define service reference in web.config, but it won't work. You can't change svc endpoint on web.config or on anything else as I aware of, it took me two days to figure this out before I found this site. It needs to be done on code (or PowerShell?) . We need to set that maxReceiveMessageSize larger than it's default value 18KB. How do you add those FeaturedInstalled method in SharePoint 2013? I googled and found another site that explained this. Basically you need to override a FeaturedInstalled method and set that endpoint in there. Wrapping it all together, this is what I did. We need to set maxreceivecontent on wcfServiceSetting for our REST service file. We can set it during feature deployment.
  1. Add a new class, I name it FeatureEvent.cs
  2. Inherits that class to SPFeatureReceiver
  3. Override method FeatureInstalled
  4. Then add code to change ReaderQuotasMaxStringContentLength, ReaderQuotasMaxArrayLength, ReaderQuotasMaxBytesPerRead, MaxReceivedMessageSize just like bellow

using Microsoft.SharePoint;
using Microsoft.SharePoint.Administration;
using System;
using System.Collections.Generic;
using System.Linq;
using System.Text;
using System.Threading.Tasks;

namespace UploadFileUsingREST
{
    public class FeatureEvent : SPFeatureReceiver
    {
        public override void FeatureInstalled(SPFeatureReceiverProperties properties)
        {
            SPWebService contentService = SPWebService.ContentService;
            SPWcfServiceSettings wcfServiceSettings = new SPWcfServiceSettings();
            wcfServiceSettings.ReaderQuotasMaxStringContentLength = Int32.MaxValue;
            wcfServiceSettings.ReaderQuotasMaxArrayLength = Int32.MaxValue;
            wcfServiceSettings.ReaderQuotasMaxBytesPerRead = Int32.MaxValue;
            wcfServiceSettings.MaxReceivedMessageSize = Int32.MaxValue;
            contentService.WcfServiceSettings["uploadrest.svc"] = wcfServiceSettings;
            contentService.Update(true);
        }
    }
}

We then need to create a feature that will run that file when the feature got installed.
  1. Create a new SharePoint feature file
  2. Open that feature and click on Manifest tab
  3. Expand Edit option
  4. Then add ReceiverAssembly and ReceiverClass just like bellow

<?xml version="1.0" encoding="utf-8" ?>
<Feature xmlns="http://schemas.microsoft.com/sharepoint/" ReceiverAssembly="UploadFileUsingREST, Version=1.0.0.0, Culture=neutral, PublicKeyToken=282a31b1b9f5b608" ReceiverClass="UploadFileUsingREST.FeatureEvent">
</Feature>

Deploy it and test it, I've created a console program to test this svc


    class Program
    {
        static void Main(string[] args)
        {
            FileInfo fi = new FileInfo(@"C:\testfile.pdf");
            Console.WriteLine(fi.Length);
            string urlFull = string.Format("http://documentrepositorysite/_vti_bin/uploadrest.svc/UploadFile/{0}/{1}", fi.Name, fi.Name);
            HttpWebRequest client = (HttpWebRequest)WebRequest.Create(urlFull);
            client.Credentials = new NetworkCredential("username", "userpassword", "userdomain");
            client.Method = "POST";
            client.UseDefaultCredentials = true;
            client.PreAuthenticate = true;
            using (var requestStream = client.GetRequestStream())
            {
                using (var file = fi.OpenRead())
                {
                    file.CopyTo(requestStream);
                }
            }
            using (var response = client.GetResponse())
            {
                StreamReader reader = new StreamReader(response.GetResponseStream());
                string respon = reader.ReadToEnd();
                Console.WriteLine(respon);
                Console.ReadLine();
            }
        }
    }

Testing it with 11MB file, and it completed in 10s.
Complete source code